A spOOOOOOky haunted house
Ahhhhhhhhhhhh October, have I told you that you are my favourite? The leaves have finally started to change colour and fall gracefully off the trees. The big jumpers and fluffy socks are out from the back of the wardrobe on our bodies and a massive mug of hot chocolate with cream and little tiny marshmallows in my hand!
However, October holds one day that is my favourite day of the year... Halloween! I AM SO EXCITED AND I JUST CANT HIDE IT! -Cue the rest of the song-
Of course both of this month's bake and make are Halloween related and it is time for the scary (not so scary) craft section first!
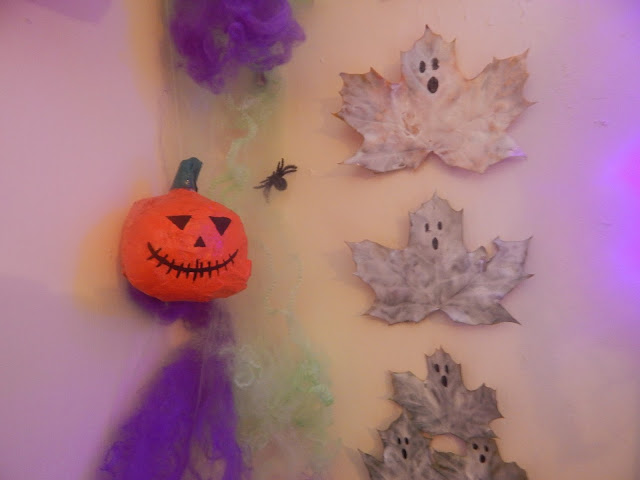
These super easy ghost leaves nightmare catcher (see what I did there???) and this paper mache frightening pumpkin!
So here is 'Halloween Ghosts and Pumpkins'...
First with the spooky ghosts!
What you will need:
A selection of leaves, different sizes (I used one big one, two mediums and three small)
White nail varnish (a lot of it)
Black felt tip (I used eyeliner)
Clear thread
Small scissors (preferably nail scissors)
A pin or something to hang it up on
What to do now:
Collect how many leaves you wish to include. Wash them in water, making sure that any dirt or bugs etc are gone, then dry them completely. Take off the stem of all leaves.
With your white nail varnish, paint the full leaf, both sides, doing one then let it dry then the other.
It will probably need maybe 3/4 layers depending on the colour of the leaf. I ran out of nail varnish after the second so it will definitely need more!
It will probably need maybe 3/4 layers depending on the colour of the leaf. I ran out of nail varnish after the second so it will definitely need more!
Allow the varnish to dry completely and make sure there are no bits left uncovered.
Once you are certain everything is set, take your black felt tip or eyeliner and draw three small oval shapes on the top point on the leaf as this creates the spooky face of your ghosts! Allow this to set a bit.
Now to attach them all together!
To create the small holes for the thread, gently pierce the top of the leaf with one part of your small scissors.
To create the small holes for the thread, gently pierce the top of the leaf with one part of your small scissors.
Cut some clear thread off , place through the holes and tie them up, pin it or put it up with whatever you are using and voila, you have a nightmare catcher!
Now for the creepy paper mache pumpkin!
What you will need:
An old ball (I crumped up some scrap paper and cello-taped it into the shape) or a balloon
Newspaper
White paper
White paper
Bowl
PVA Glue
PVA Glue
Green and orange paint or nail varnish
Black felt tip pen or eyeliner
Clear thread (optional)
Needle (optional)
Pin (optional)
Black felt tip pen or eyeliner
Clear thread (optional)
Needle (optional)
Pin (optional)
What to do now:
Take your ball, blown up balloon or crumple up some paper and cello-tape it together and make sure it is clean and hasn't got any dirt on it.
Pour the PVA glue in the bowl and tear up the newspaper into pieces, you don't want them too big or too small!
Dip a piece of paper into the glue, making sure it covered and taking off any excess glue. Place it on your ball or balloon and do this until it is fully covered. Leave it to dry.
Do this a few times, smoothing it out if possible. Tear up some white paper and stick it around the dried newspaper and leave it to set again!
Crumple up some paper into a curved sausage shape and stick it on the top. This is the vine of the pumpkin. Again, leave the pumpkin for a couple of hours until the glue is completely dry.
Once it is set, paint the pumpkin with your orange nail varnish or paint! Take the green nail varnish and paint the vine. Leave to dry again (there is a lot of drying in this). It may need a couple of coats.
After that has dried, draw on a scary face with your black felt pen or eyeliner.
Almost done now, but this is optional. If you are want to hang it up, like I did, then continue but if you don't and want to place them on a table of windowsill etc then you are done!
If you want it hanging then put the clear thread through a needle, doubling it up and tying it in a small knot at the top.
Pierce the needle through the vine in an upward angle and again tie the thread at the top to secure it. Cut off any thread that may be there.
I used a pin but you can use whatever you want to hang it up with and voila, you are done again!
I know I know, mine are a bit crappy. I ran out of both white and orange nail varnish to full cover them so mine are a bit patchy.
Howeverrrrr, the concepts are still the same!
These scary pumpkins are perfect for your kids or for if you love to get your hands into a sticky slimy mess! And the leaves are great too if you love going for walks and what to use fallen leaves for something creative!
Howeverrrrr, the concepts are still the same!
These scary pumpkins are perfect for your kids or for if you love to get your hands into a sticky slimy mess! And the leaves are great too if you love going for walks and what to use fallen leaves for something creative!
...
Well there you have it!
Not one but two scary crafts for you to do or your little monsters!
Keep your blood shot eyes out for the bake!
Until next time
-------------------------------------
All photographs are my own!


I love October and Halloween. Yay time to get my smelly Halloween tea out. Yay. I love these ideas there amazing. Will have go once when in the new house.
ReplyDeleteThey are my favourite and ooo the Halloween tea sounds interesting!! And I am glad you like them, they are so easy to do! x
DeleteThe Halloween tea is Toffee Apple from Whittingtons tea shop.
DeleteThe Halloween tea is Toffee Apple from Whittingtons tea shop.
DeleteOh my gosh, I neeeeeeeed to try this tea out! It sounds amazing! x
DeleteThese are super cute!
ReplyDeleteThank you! x
Deletethose ghosts are just adorable!
ReplyDeletehaha they certainly are! x
DeleteI was literally telling my friend today that I would love to have a Halloween party...maybe I should use these ideas ;)
ReplyDeleteHahaha these would be great for them, especially the pumpkins! They are so easy to do! x
DeleteThis is super cute! I love all these ideas, and great money saver to!
ReplyDeleteKarina | http://karinahearts.com
Glad you like them and yeah they are, maybe like £10 for all of the materials and you can make loads! x
DeleteI so love these! Too bad I have two left hands :(
ReplyDeleteI am sure you can do these, they are so easy to make!
DeleteThe leaves are such a cute idea! I seen them on your insta and wondered how you made them. I love it! xx
ReplyDeleteBeth | Polishedcouture.wordpress.com
Thanks Beth and yeah, they are so simple to make! x
DeleteThese look amazing and such a perfect DIY to make! Might make these with my flat mates X
ReplyDeleteDo it! If you do then I would love to see yours! x
DeleteI looove these ! My favourite time of year ! Great post lovely !
ReplyDeleteLaura x
lauraslittleworldblog.wordpress.com
Aw I am glad you like them! And same, Halloween is my favourite day by far! x
DeleteA+ to the creativity! I love people who do decorating and arts and crafts! This is lovely. Great post hun💗💗💗 keepingupwithMJ.com xxx
ReplyDeleteAw thank you, glad you love it! x
DeleteOmg these are amazing! I crafts and I feel like Halloween is the PERFECT time for stuff like this! Great post lovely. X
ReplyDeleteThank you sweetie, I love getting creative at Halloween! SO much stuff you can make! x
DeleteLoved these ideas this has got me even more excited for Halloween now love it xxx Pixie
ReplyDeleteI am glad it has gotten you even ore in the mood for the day, glad you like the post! x
DeleteI love these they look really good, be amazing to do with children
ReplyDeleteTasha x
http://itsatashathing.blogspot.co.uk/
Definitely, something that little ones would love to do probably! x
DeleteOh my goodness those ghost leaves are so cute!! 👻 Definitely need to try these!
ReplyDeletehttp://www.midnightandlace.co.uk/
Do it, do it, do it! I wanna see them if you do as well lovely! x
Delete